There are several schools of thought about how to set up your touring bike, but generally you want to balance weight and keep stuff dry. Past that, there are enough options that I felt overwhelmed for days back in May when I was trying to order bags, clips, racks, dry sacs, bottle holders, etc. Most of the serious stuff is only online, so you can’t really see it and try it out without buying it first. So I did my best in Boston by picking the brains of a lot of people, wrestling with conflicting advice, and comparing vague specifications on websites. From the beginning, I decided I would do my best in Boston, then fix everything that was wrong once I got to home base in Cleveland.
The First Try

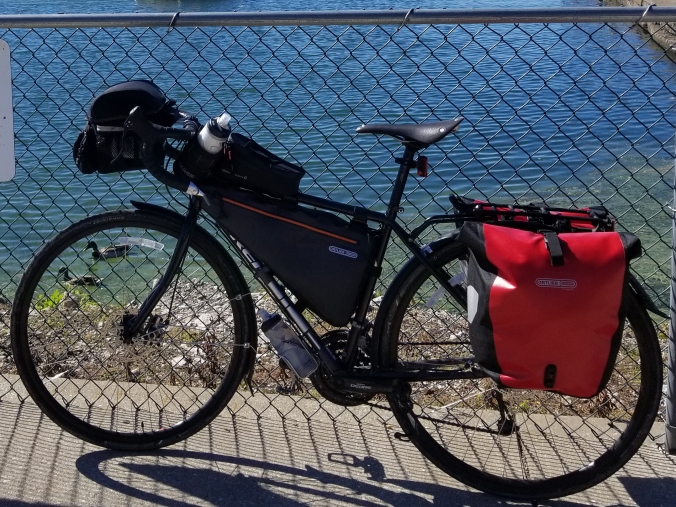
This setup got me the first 750 miles. Weight = 65 lbs. My bike is a 2017 Trek 520 with disc brakes.
- Trunk-shaped handlebar bag: electronics, food, toiletries, wallet, sunglasses
- Food pouch: used as bottle holder
- Top bar bag: bike tools and tubes with slot on top to hold cell phone
- Tire pump clipped to frame
- Fenders
- Frame bag (the triangular one): rain gear and tent poles
- Bottle holder on the bottom of the down tube
- Side panniers: clothes, another water bottle, camping gear, kindle, solar panel
- Fenders
In some ways my first setup was the conservative choice. Side panniers are classic, they hold a lot, they’re durable, and they keep the center of gravity lower for better balance. But they’re heavy and they stick out to the sides and create extra drag in the wind. I also came to abhor the handlebar bag because, though it was highly useful, it’s crazy heavy, and it blocked my view to the front tire and some of the road immediately in front of me, so somehow I felt like I was driving a minivan. I also didn’t have easy-enough access to water bottles.
Take Two

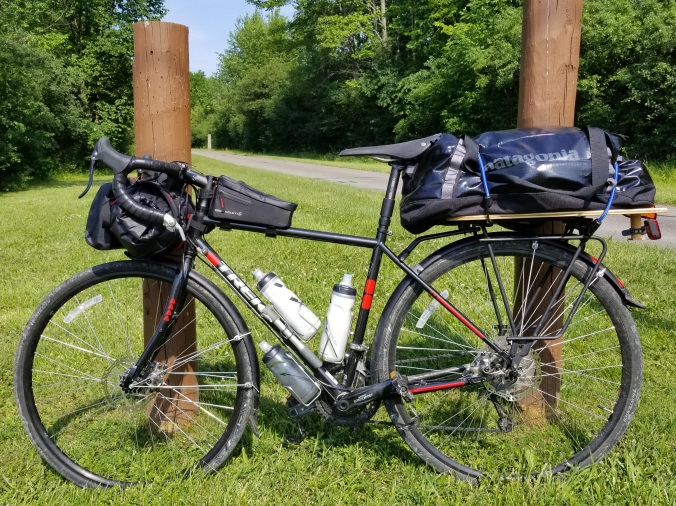
Weight = 63 lbs (2 lbs less!)
- Front pouch: wallet, sunscreen, eye protection, kindle
- Front dry bag: all camping gear other than my tent
- Harness to hold those two front bags
- Top bar bag: food on the inside, cell phone on the top
- Tire pump clipped to frame
- Fenders
- Three mounted water bottles: two with easy access!! (new!)
- Safety reflective decals, red (new!)
- Extra duct tape and electrical tape wrapped around the seat tube (new!)
- Homemade board on the back rack to support the duffel bag
- Duffel bag: tent, clothes, rain gear, tools, toiletries, solar panel, extra capacity
This setup is much closer to what I really wanted to create initially, but in Boston, I found that I couldn’t affix the duffel bag to the back rack securely enough to prevent it from sliding around when I turned, which presented a safety problem. Reasons for a duffel bag: it sits directly behind me so there is no extra wind drag, it’s lighter and easier to keep organized than panniers, and it has extra space for when I’ll need to carry more food and water with me out west. The top of the duffel provides a great surface to support my solar panel or drying clothes while I ride during the day too.
The front bags by Revelate Designs are just plain awesome and a lot lighter and more sleek than the trunk-like thing I had before. Finally, I’m glad to be rid of the frame bag because it didn’t quite stay centered between my legs, and I think the asymmetry affected my peddling and contributed to a budding injury I have in my left knee/shin. And easier access to water, I think, will be invaluable.
Customized!
So the real story here is how much my step father Kert and my mom helped me with the redesign. Kert and I (mostly Kert) worked on two prototypes for the back rack to support the duffel bag. Features include very secure connections to the existing rack, holes to accept the hooks of bungee cords, and larger holes in the middle to reduce weight. And since the duffel bag will block the seat post, Kert added a small dowel in the back for me to affix my blinky red light (easier seen in the image above these two). And Mom made me new straps with buckles to keep the top bag more tightly fixed so it doesn’t flop over and hit my legs while I peddle. Thank you to you both.
Several test rides prove that the new setup feels much better than the original configuration. A fully-loaded touring bike can’t feel like a sports car, but it’s at least a Subaru, and decidedly not a minivan. The new setup feels like something I can cross the country with!


I personally love the ShopSmith !!!
LikeLike